Tuesday, November 02, 2010

Earrings for heat

The building I rent my studio from has been in need of improvements and as winter is fast approaching we decided on a wood stove to help heat the massive hallway.  To help pay for the materials we held a support party which went great.  Super fun and everyone pitched in with the details and running the bar and entertainment.  

Meanwhile, the girls and I have been making some fun wearable sell-ables in hopes of generating some income for other improvements needed.  Caroline, My, Laura and I sat for weeks sorting through multi-colored bags of plastic beads and coming up with cute and cool motifs that we either thought might sell or that we just had to do for the fun of it.  

I found that the beads come in teeny-tiny size and decided to make it my trademark style. Also, couldn't see myself wearing the large and loud ones the other girls are so good at pulling off. So, a bit more discreet and petite for me.


Later on I decided that it needed some proper packaging to give it a finished look, better sell-ability and to give credit to our cause.


Little package boxes in 4 different colors that are cute to hold and easy to pack.  On the bottom of the package is a little blurb about our building and the historical area we are in.

and for a personal touch, each pair of earrings says who handmade them.


There is a larger package for the girls' and I'll put photos of that up next along with the display case I still need to make as we now have a shop in town that wants to carry them!  

YAY:-)

Saturday, October 23, 2010

Love for the old soul - Part 2

Luckily I have a fairly stocked studio and found most of what I needed.


  • Wallpaper paste
  • Paint scraper
  • Plastic bowls
  • Q-tips
  • Sponges
  • Caustic soda
  • Gloves
  • Brushes
  • Fine sandpaper
  • Linseed oil
  • Insanity
First step: Off with the metal bits.  Not good to expose it to acid if I don't really know what kind of metal it is.  Most bits looked brass. Loads of screws and a few nails as well and a lock (sadly no key).

Second step: Remove paint.

By mixing the wallpaper paste with the caustic soda, the paint softening acid sits where you want it to and doesn't drip.  You can coat several sides at once and let it do the work while you make some coffee.  It took several soaks and washes.  Apply goo, let it sit, scrap it off.  Rinse.  Repeat.  After a few times I rinsed it in water and let the wood dry a few days.  I worked on one part (Lid or base ) at a time.  When the box was as dry as I could wait, I used Q-tips to take off the remaining paint in hard to reach corners and such.  Occasionally I had to use a wood chisel to ever so gently scrape a fine layer of paint infused wood away.  After which I sanded everything smooth again.

I kinda wish I would have taken more photos of the steps I took but I think the work was mostly meditative  and I didn't think of it.

I did the same with the tin trays and brass fittings, screws 'n everything metal; Acid, rinse, sand.  I did this and not much else for 7 days.  One part dried while I worked on the other.   Then both needed to dry and I worked on the metal.

For the finish and health of the wood, I coated it 3 times with linseed oil.  Every week or so I still do that to keep it from getting thirsty.  I need to find a key for it as well.  Maybe the German silversmith across the hall with make one for me.

  • Aprox. cost of box: 3 dollars
  • Aprox. cost of restoration: 10 dollars
  • Estimated value: 150 - 200 dollars

I know this is a heck of a build up.  "How does it look?" you ask...


Absolutely gorgeous. 


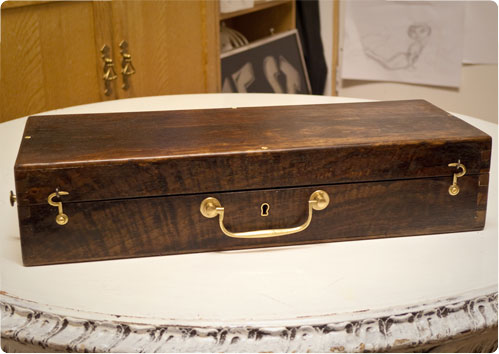
Front cut from single piece as you can see in the wood grain.


Yup, Mahogany 


Yup, Brass fittings


Mid 1800's Mahogany travel paintbox


Love for the old soul - Part 1

Husband and I and a car-full of people from Riggersloftet all took a drive to The Blue Hall, a local flea market.  Great building of room after room of Antiques, bits and bobs, junk and jems.. you never know what great stuff you'll trip over.  This trip I picked me up a few things for what I would consider a real steal.

After not finding much to my interest or of interest to my wallet, a rather nice fella let me have a handful of old gramophone records and this old paint box for 35 kr. The box itself was only 15, around 3 U.S. dollars.

Here are some photos of what it looked like when I bought it.  

Side view where you can see the tarnished brass buttons where a leather strap would fasten to tote your paintbox around. (Brass? Really? Nice feature to a beat up 'ol box)


Here if you look closely you can see the dovetail joints.  If you could look real close you can see that they are hand carved.  And where the paint has chipped off, you can tell it's a decent hard wood. (Hmm, hard wood can always be mended.. so it's a solid box)


The inside of the box with 2 trays for paints and brushes.  (I paint, heavy solid box, has some brass bits..Interesting enough to me, and this is why I bought it.)


When the box was covered in enamel paint, it looks as though the drying process was either disturbed or very poorly done as there are peaks of paint that stand up from the surface 1-2 millimeters... and then painted over again.  The paint is yellowed from age I suspect.


With some tugging I discovered that the trays are removable and made of zinc.  After finding one similar box online, though a deluxe model, I am inclined to think the trays were added at a later date. 

I had found my next project. :-D

Saturday, October 02, 2010

Circus foot stool

One of the girls in my building is a circus performer and co-owner of Tin Can Company.  Really fantastic woman.  She donated a a small piece for me to reupholster  as I was looking for a project so I could procrastinate on a current project.  Took 2 days, a few coats of paint, clear lacquer, fabric and foam, and brass tacks.

Here are the results.

BEFORE


AFTER

Cheers, K

Studio Production- Dad's carepackage


Lots has been happening in the studio these past months.  I've had some time off to immerse myself again and I'd like to share some progress that I'm proud of.

Dad's birthday care package was a great deal of fun.  I had long decided that it would be civil war themed and after seeing some obvious jealousy over brother Brian's red linen shirt I knew what had to be done.

I had to make him one.  

So, confederate grey linen was chosen and I hand stitched everything.  My first ever hand stitched piece of clothing and I think only a few people can really appreciate the effort in detail.  I can confidently label myself a "stitch-counter", a term used for re-enactors that have a high standard of authenticity some may call excessive. :-)

The package contained:

1 hand stitched, civil-war period shirt

1 pair hand knitted socks
1 hand written, civil-war period letter 
several boxes of matches
1 slate board and graphite 
Wrapped with tea and coffee stained paper, bound with hemp twine


SHIRT- Handmade custom pattern, Mid-thigh length, Long sleeve, Wooden buttons.


LETTER- Authentic "letter from home" hand written, cursive-style script.  I used bottled ink and pen,  closed with sealing wax and personal seal emblem.

Cheers, K

Wednesday, April 21, 2010

Studio life- Bread day

Carolina, who works at a bakery brings home all the good that are marked for disposal and we go down to the pier and feed the birds by the flock-load. Very fat birds out there.

The view of the harbour cafe out by the studio and gorging seagulls.


Subi loves bread and puts on her gull impersonation.

Studio production- Blue 1930-40 armchair

This chair is an old soul and I'm quite attached to the whole experience.

Now I wish I had taken before photos to show the extent of the repair but I think you can see that the result is rather good anyhow.

I found this chair discarded and had to adopt it. The original covering was leather fixed with brass upholstery tacks. The leather, so old, it had ripped like cardboard paper on all sides and the tacks were green with oxidation. I thought it a hearty solid chair and it still had some life left as well as the original springs and under structure in place so I grabbed it.

I have a favorite fabric store that is stocked with warehouse leftovers and has the most reasonable prices. I got the fabric and trim for this chair for around 200 kr. which is roughly 36.00 U.S. dollars.

I made plenty of mistakes and wasted too much fabric but it's my first ever upholstery project and I'm proud of it. By the way, give me some input on how old you think it is :-)


When I had taken off the old covering there were 2 old black and white passport photos stuck between the layers. I also used these to help date the chair.


Wednesday, January 27, 2010

Trans Atlantic Travels

Were I to have taken a steamer over the pond I would have arrived only recently.. if at all. I can then, by retrospective excuse pardon my procrastination. *insert guileless smile*


My favorite cools things I did on holiday visit:


It snowed a bunch

And I couldn't help myself. I was dragged off several times as other things were planned but I HAD to make a snow sculpture. The only figure that made sense to me at the time when considering all the snow activities possible was a Snow Bunny. Of course.

I had to get the bulk of the snow gathered while it was still sticky snow. I didn't have enough time before dark and I knew the temperatures would be too cold and unfortunately freezing the mass solid overnight. So the result is from carving the frozen packed snow. I used a water bottle with a spray nozzle as my glue. Temperatures were brutal, averaging around -12 Fahrenheit. The ice carving doesn't lend too well to detail but I was proud and satisfied. In the end I used coal for the eyes and broom bristles for the whiskers and colored water for pink cheeks and paws and a green star burst grass-like ground (though the colors faded as they froze)

It surprised and flattered me how many people stopped to look at it- neighbors dog walkers, the garbage collectors and mail man, passers by... I was delighted every time I saw it. One morning I woke to find it decapitated by the degenerates that live across the street. That's really when I found out how Mr. S. Bunny had affected people.


The presents I made were a hit

I made 5 fabric kræmmerhus with goodies inside for mom. Kræmmerhus is a danish Christmas decoration which is very similar to our American stockings hung by the fire... only they hang them on the tree and stash goodies in them. Very old world feeling shape to them.


I made Brian 2 shirts for his Civil War re-enactment wardrobe. Both with hand stitched button holes and wooden buttons based on a pattern from the 1800's. One long night shirt made from muslin and one regular shirt, made from red linen flax and also featured a lined front pocket. I have never seen my dad look so envious. A real treat to see it fit! And he liked it.


I sculpted a troll figurine out of fimo clay and hand stitched clothes for the fella. He turned out so well I was inspired to make a tree for him to live in. The doll was so popular it lost a finger in the first 24hours and was shipped to dads shop for repair. Jason loved it.

XOXO-Kyr


Friday, December 18, 2009

Drawing, painting, sculpting... surely one will do the trick?


He started out as a sketch a few years ago and while going through art pads for inspiration and some stone to leap from, I found him lodged between scribbles, barely formed yet entirely sure of himself. Wanting to break in my new easel given to me by Husband as a wedding gift, I decided this noble fellow would be my first excuse to wear the shine off and get started. I had not painted in quite a long time and though it is like riding a bike, the nervousness of hitting obstacles and other immovable objects, like practice, gave me a passing flicker of dismiss able thought. Doesn't matter if I can't paint, I'll learn again or at the very least. the tragedy of enjoying myself trying.

I picked a medium canvas and decided acrylic would be to my speed. Easily forgivable and not much waiting time between attempts.

The first underpainting took an hour to block out and not much
trouble. The next hour was building up basic highlights and shadows and roughing in the volume. So far NO problem. I was quite pleased. A few breaks and cups of coffee in between drying layers, play with the dog and chat with some of the guys in the building. In fact I was feeling so confident, I started a fimo clay figure head, though the painting kept luring me back. A wonderful way to spend a cold winter day.

Day two: Working well. And then I hit the wall.


I just got stuck with shadows and details, started messing up the clothing.. BAH. Time for a different approach.

So I found that you can get really cheap clay here around the holidays. Apparently it's used for sticking plants and things into for table decorations. 2 kilo for 1 dollar 20. Man! Genius! I got myself a whole new media. I haven't really worked with clay so much and wanted to make a study of this froggy fellow to help me with the detail work of the painting based on the sketch.

Nothing finished but still enjoying the tragedy of it all :-)

Love from Cph

Wednesday, December 16, 2009

The Making of an Art Studio and Happy Domesticates

Husband is a gem of a man and quite the anthropologist when it comes to his wife. I am often in awe of his insight and consideration as to the methods of enriching my life and thrivelyhood. I am an unfortunately simple organism that has few requirements though to describe them would give entirely the opposite impression. Husband can however give you the rules of how to take care of a Kyrie should you find one in the wild and wish to domesticate it with any degree of success and happiness to the both of you.

A recent concern has been that quite often they can become lethargic and depressed when confined to a static or unchanging environment or one which is too small for it's needs...

(Cue: sound of heavy footed tripping followed by tense cursing)

A build up over time of this can lead to a very frustrated and unhappy state commonly expressed by terse and repetitive remarks (often complaints guised as accusations), fits of anger, acquiescence, and other outward expressions of melancholy. A very cranky situation all round.

The answer? Make an Art Studio.

(Cue: raucous applause, laughter and shouts of joy)

I am the proud renter of an atelier- 18 square meters of pure creative space. Out in the abandoned and newly re-purposed B&W shipyard area of refshaleøen. The top floor of the old riggers building is where I rent my space from. It's the orange brick building to the left. The bottom level is leased to an auto repair shop and the entrance of the building neighbors a huge antique warehouse where often

I find discarded furniture to re purpose. All of my storage shelves and chairs have been contributed in this fashion and I am quite proud to support the recycling mentality though were I to be a perfectly upstanding citizen I would have to allow these items to be picked up by the city disposal (I am a tax payer to technically I am paying for it already) and drag it off to a dump where it would be burned or mulched (I mostly save hard wood items- they can have the metal).

It was Husband's idea, he got me started by sending me adverts from the local paper and I took it from there, and found my new joy-ground.

This is the BEFORE, looking in.

The building has several rooms for rent and has around 8 creative residents and 4 studio renters: musicians, painters, photographers, an installation artist and circus performers. The part I rent is a section of a large room which was divided by makeshift partitions, cutting the room into 3 ateliers, each a little under 18 square meters. One large window each and the small circle on the back wall is the ventilation.

Of course there is no heat in the building, no electric heat anyway. Each atelier comes with a gas
space heater- I buy the gas tanks, they loan the heaters. Not too pricy, if you dont have to heat the whole room that is. Windows are 2 layers of plexiglass, no insulation on any surface and this is scandinavia.. a bit of a challenge for someone who loathes the cold.

This is the BEFORE, my back to the window

Where Subi is sitting is the hallway to access the other sections. The comfy chair was donated by my wonderful Svigermor, Dorthe (Mom-in-law). With the heat being an issue for me I promptly went about pitching the idea of building a proper insulated wall and was met with agreals all round. HuRAH! Husband and I spent 2 weeks building it and laying insulation on the floor along with a few carpets and thin plates of particle board, painting the walls and moving in all my tools and supplies.

The final result. AFTER looking in

I have a clay and sculpting station at the window. The table top is glass and I can alternatively use it for lino-print and general hard surface requirements. To the immediate right I have my painting easel, frames and canvases stacked in the corner. 3 quarters of the wall is taken by shelving of supplies and tools, including my sewing machines and coffee making gear.
In the foreground to the left I have a desk which extends in length for sewing and other large projects needing a sturdy indestructible surface.

AFTER, with back to window

I have a split, dutch style door to help with ventilation and the occasional passing inquiry which allows me to open the top part while keeping some of the heat as well as the dog in. I have had several comments on how hot it is in my studio... LOVELY.

Husband is SO jealous :-D
I am overjoyed!

Hugs and Love from a real live artist