Saturday, October 23, 2010

Love for the old soul - Part 2

Luckily I have a fairly stocked studio and found most of what I needed.


  • Wallpaper paste
  • Paint scraper
  • Plastic bowls
  • Q-tips
  • Sponges
  • Caustic soda
  • Gloves
  • Brushes
  • Fine sandpaper
  • Linseed oil
  • Insanity
First step: Off with the metal bits.  Not good to expose it to acid if I don't really know what kind of metal it is.  Most bits looked brass. Loads of screws and a few nails as well and a lock (sadly no key).

Second step: Remove paint.

By mixing the wallpaper paste with the caustic soda, the paint softening acid sits where you want it to and doesn't drip.  You can coat several sides at once and let it do the work while you make some coffee.  It took several soaks and washes.  Apply goo, let it sit, scrap it off.  Rinse.  Repeat.  After a few times I rinsed it in water and let the wood dry a few days.  I worked on one part (Lid or base ) at a time.  When the box was as dry as I could wait, I used Q-tips to take off the remaining paint in hard to reach corners and such.  Occasionally I had to use a wood chisel to ever so gently scrape a fine layer of paint infused wood away.  After which I sanded everything smooth again.

I kinda wish I would have taken more photos of the steps I took but I think the work was mostly meditative  and I didn't think of it.

I did the same with the tin trays and brass fittings, screws 'n everything metal; Acid, rinse, sand.  I did this and not much else for 7 days.  One part dried while I worked on the other.   Then both needed to dry and I worked on the metal.

For the finish and health of the wood, I coated it 3 times with linseed oil.  Every week or so I still do that to keep it from getting thirsty.  I need to find a key for it as well.  Maybe the German silversmith across the hall with make one for me.

  • Aprox. cost of box: 3 dollars
  • Aprox. cost of restoration: 10 dollars
  • Estimated value: 150 - 200 dollars

I know this is a heck of a build up.  "How does it look?" you ask...


Absolutely gorgeous. 


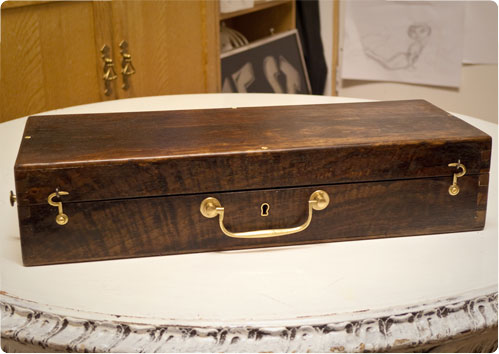
Front cut from single piece as you can see in the wood grain.


Yup, Mahogany 


Yup, Brass fittings


Mid 1800's Mahogany travel paintbox


Love for the old soul - Part 1

Husband and I and a car-full of people from Riggersloftet all took a drive to The Blue Hall, a local flea market.  Great building of room after room of Antiques, bits and bobs, junk and jems.. you never know what great stuff you'll trip over.  This trip I picked me up a few things for what I would consider a real steal.

After not finding much to my interest or of interest to my wallet, a rather nice fella let me have a handful of old gramophone records and this old paint box for 35 kr. The box itself was only 15, around 3 U.S. dollars.

Here are some photos of what it looked like when I bought it.  

Side view where you can see the tarnished brass buttons where a leather strap would fasten to tote your paintbox around. (Brass? Really? Nice feature to a beat up 'ol box)


Here if you look closely you can see the dovetail joints.  If you could look real close you can see that they are hand carved.  And where the paint has chipped off, you can tell it's a decent hard wood. (Hmm, hard wood can always be mended.. so it's a solid box)


The inside of the box with 2 trays for paints and brushes.  (I paint, heavy solid box, has some brass bits..Interesting enough to me, and this is why I bought it.)


When the box was covered in enamel paint, it looks as though the drying process was either disturbed or very poorly done as there are peaks of paint that stand up from the surface 1-2 millimeters... and then painted over again.  The paint is yellowed from age I suspect.


With some tugging I discovered that the trays are removable and made of zinc.  After finding one similar box online, though a deluxe model, I am inclined to think the trays were added at a later date. 

I had found my next project. :-D

Saturday, October 02, 2010

Circus foot stool

One of the girls in my building is a circus performer and co-owner of Tin Can Company.  Really fantastic woman.  She donated a a small piece for me to reupholster  as I was looking for a project so I could procrastinate on a current project.  Took 2 days, a few coats of paint, clear lacquer, fabric and foam, and brass tacks.

Here are the results.

BEFORE


AFTER

Cheers, K

Studio Production- Dad's carepackage


Lots has been happening in the studio these past months.  I've had some time off to immerse myself again and I'd like to share some progress that I'm proud of.

Dad's birthday care package was a great deal of fun.  I had long decided that it would be civil war themed and after seeing some obvious jealousy over brother Brian's red linen shirt I knew what had to be done.

I had to make him one.  

So, confederate grey linen was chosen and I hand stitched everything.  My first ever hand stitched piece of clothing and I think only a few people can really appreciate the effort in detail.  I can confidently label myself a "stitch-counter", a term used for re-enactors that have a high standard of authenticity some may call excessive. :-)

The package contained:

1 hand stitched, civil-war period shirt

1 pair hand knitted socks
1 hand written, civil-war period letter 
several boxes of matches
1 slate board and graphite 
Wrapped with tea and coffee stained paper, bound with hemp twine


SHIRT- Handmade custom pattern, Mid-thigh length, Long sleeve, Wooden buttons.


LETTER- Authentic "letter from home" hand written, cursive-style script.  I used bottled ink and pen,  closed with sealing wax and personal seal emblem.

Cheers, K